Prikaz objav z oznako DIY. Pokaži vse objave

sreda, 24. oktober 2012

How to: Fold A Fitted Sheet


1. Stand holding the sheet by the two adjacent corners of one of the shorter edges. With the sheet inside out, place one hand in each of these two corners.

2. Bring your right hand to your left, and fold the corner in your right hand over the one in your left, enveloping it. Next, reach down and pick up the corner that is hanging in front; bring it up, and fold it over the two corners in your left hand; the corner that's showing will be inside out.

3. Bring the last corner up, and fold it over the others; with its right side showing, it should envelop the other three corners.

4. Lay the folded sheet on a flat surface and straighten it into the shape shown.

5. Fold the two edges in so all the elastic is hidden.

6. Fold the sheet into a rectangle.

7. Continue folding until the rectangle is the size you want it to be.


Pin It

petek, 19. oktober 2012

petek, 6. julij 2012

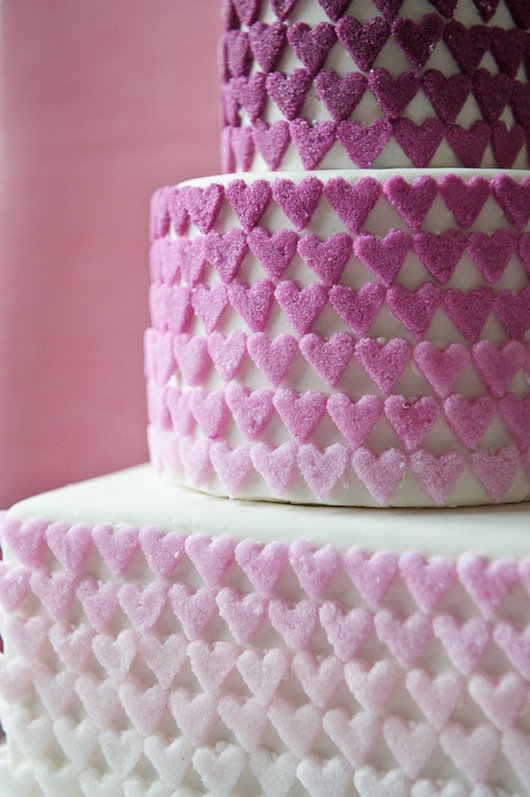
DIY Ombre Sugar Hearts


What you’ll need

Two cups sugar (or more, depending on the number of colors you want), divided
4 teaspoons (or more) egg white or liquid meringue (1 teaspoon of meringue powder mixed with 1 tablespoon warm water)
Paste food coloring (found at local craft store)
Large cutting board, baking sheet or other flat surface, lined with Silpat or parchment paper

and
Baking sheet lined with Silpat or parchment paper

Ateco aspic cutters or small cookie cutters


Additional:

Small and medium bowls | spatulas | rolling pin | measuring spoons | measuring cups | ziplock bags | butter | knife

Optional:

3 x 4-inch treat bags | colored ribbon | cake to decorate


Step 1.

Place ½ cup sugar in medium bowl. Add a small amount of paste food coloring (we used a combination of Wilton’s Rose and Violet), and mix thoroughly. This will be your darkest color. (Hint: A little goes a long way and will darken once liquid is added in next step.) Add more if needed until desired color is achieved. Add 1 teaspoon egg white or meringue liquid and mix thoroughly until the mixture resembles wet sand. Be careful not to add too much liquid or you will dissolve the sugar.


Step 2.

Empty contents onto Silpat or parchment lined cutting board or baking sheet. Spread with hand or spatula and pat down, then roll over mixture with rolling pin to compress. Ideally, the flattened mixture should be as compact as possible and level, about ¼”. Press heart cutter into mixture and lift up. Place hearts on lined baking sheet. If cutter will not release heart, gently tap with the back of a butter knife. Repeat 10-20 times or as many as desired. If hearts will not hold their shape, add more egg white or meringue liquid in small increments and mix thoroughly. If sugar builds up in cutter, rinse with warm water and pat dry before continuing. Pour remaining colored sugar back into bowl and proceed to Step 3.


Step 3.

Add ½ cup sugar to colored sugar  from Step 2 to lighten. Mix thoroughly. Add 1 teaspoon egg white or liquid meringue. If desired color is not achieved, continue adding additional ½ cup sugar plus 1 teaspoon egg white or liquid meringue and mixing thoroughly until desired color is achieved. Repeat Step 2. Continue with Steps 2 and 3 until desired shades and number of sugar hearts are achieved. We recommend at least three to five shades. Leftover sugar can be stored in ziplock bags for future use.


Step 4.

Heat oven to 200 degrees. Heat hearts in oven for 10 minutes. Allow to harden overnight. Sugar hearts will be the consistency of sugar cubes.


Design Options:

Place 10-20 sugar hearts in treat bag. Staple ribbon to bags. Tie ribbon. Can be given as gifts or used as favors.

For cake: Attach sugar heats to cake using royal icing. Begin with darkest color on smallest tier. Continue with lighter colors.


Have a gorgeous day, 
M.
Pin It

petek, 22. junij 2012

Seriously want to do this!

I saw this amazing idea and so want to do it!! M. & me already had few anniversaries so far since we're together since high school (yep, we're totally rocking high school sweethearts over here :) ) so we need to make this happen soon!!! M. I know you are reading this, so you better be on the same page with me abour that. ;) 


So you're probably guessing what the heck am I talking about, right? 


So every year for your anniversary:  you take a new picture each year holding the previous years.

Pretty cool, ha? Will try to do that ... well at least I hope we will. ;) 

Have a lovely day, 
M.

Pin It

nedelja, 17. junij 2012

No Bake Butter Biscuits Cake


Hello lovely readers of this gorgeous blog! :)) 

I bet you love to eat sweet and yummy things, don't you?? Well but first someone needs to make it, right? So why won't you bake this lovely No Bake Cake?? 

I won't take to much of your precious time (because you want to make this dessert as soon as possible, right??), here is all you need to know: 


Your download image will be Watermark Free! 

Click on the image to download it.


[[ This recipe and image are copied from this amazing blog. ]]

I just designed it for you to download it and put it in your recipe notebook or somewhere else. 

And please let me know if you're going to bake this at home. :)

Have a wonderful day, 
M.

Pin It

sreda, 13. junij 2012

DIY Vintage Box Centerpieces


With just a minimal amount of elbow grease, you can turn old wooden boxes into rustic, one-of-a-kind centerpieces that will add a ton of charm to your tables!


Step 1: Scour flea markets, antiques stores, eBay, or Etsy for vintage wooden boxes or crates. Boxes will come in a variety of shapes, sizes, and conditions, so give yourself ample time to collect ones that appeal to you and work best for your table sizes. Don't worry if they don't all match - chances are they won't, and that's part of the charm!


Step 2: We used a simple stencil and acrylic craft paint to put the table number on the front of the box. We recommend testing out your stencil technique on a piece of scrap paper first; using too much paint will cause the number to bleed at the edges, so it's important to first get comfortable with the amount of paint that will work best. 


Step 3: Once the stencil is applied to the box and has dried, insert a plastic container inside the box to hold the water for the flowers. Cut a piece of floral foam to fit inside the container, and fill with water. Now you're ready to start filling the box with blooms!


Step 4: We loaded our container with ultra-pretty, cottage-y flowers and arranged them in a relaxed, casual way - a lovely contrast to the simple, rustic wood box.


Whatever you choose, you can be sure that this centerpiece will add something special to your tables!


by: Mary Swenson

Pin It